
How to Install Crochet Hair for Beginners
Quick Answer
To install crochet hair, braid your natural hair into a secure cornrow base, use a crochet needle to loop the crochet hair through each braid, knot or secure the hair, then shape and blend the style. Beginners should start with clean stretched hair, gentle braids, medium spacing and enough packs for full coverage without making the style heavy.
What Is a Crochet Hair Install?
A crochet hair install is a protective hairstyle where crochet hair is added to a braided base using a crochet needle or latch hook. Instead of sewing tracks onto braids, the hair is looped through the cornrows.
Crochet installs are popular because they can create curly, wavy, braided, twist or textured styles while keeping natural hair tucked away. They can also be easier to learn than some sew-in methods because the tool does much of the attachment work.
AliGrace Crochet Hair is a strong option if you want human hair crochet with natural movement, soft texture and styling flexibility.
What You Need Before You Start
Prepare everything before you begin. A clean setup makes the install easier and helps avoid uneven spacing.
| Item | Why you need it |
|---|---|
| Crochet hair | Creates the final style |
| Crochet needle or latch hook | Loops hair through the braids |
| Rat-tail comb | Helps section natural hair |
| Clips | Keeps sections organized |
| Moisturizer or leave-in | Preps natural hair before braiding |
| Edge control or styling gel | Optional for a smoother front |
| Scissors | Trims uneven ends if needed |
| Satin bonnet or scarf | Protects the style after install |
Do not start with dry, tangled natural hair. Your braid base is the foundation of the style, so preparation matters.
Step 1: Wash, Condition and Stretch Your Hair
Start with clean hair and scalp. Crochet hair may stay installed for a while, so you want your natural hair to be fresh before it is braided.
Before braiding:
- Wash your hair gently.
- Condition and detangle.
- Apply a light leave-in or moisturizer.
- Stretch the hair with braids, twists or blow-drying on low heat if needed.
- Make sure the hair is dry before installing.
Avoid heavy oils before installation. Too much product can cause buildup under the crochet style.
Step 2: Choose the Right Braid Pattern
The braid pattern controls how natural, flat and comfortable your crochet style looks. Beginners should start with a simple cornrow pattern instead of trying something complicated.
| Braid pattern | Best for | Beginner level |
|---|---|---|
| Straight-back cornrows | Simple full crochet styles | Easy |
| Side part pattern | Side part crochet looks | Medium |
| Middle part pattern | Natural parting effect | Medium |
| Vixen pattern | More styling versatility | Advanced |
| Perimeter leave-out | Natural hairline blend | Medium |
For your first install, straight-back cornrows are usually easiest. They are simple, secure and work well for full curly crochet styles.
Step 3: Braid Gently
Your cornrows should be secure but not tight. A protective style should not create pain, bumps or tension around the edges.
Good braid base rules:
- Keep the front braids gentle.
- Avoid pulling tightly at the temples.
- Make the braids flat enough for a smooth shape.
- Tuck or sew braid ends down securely.
- Leave enough spacing for the crochet hair.
If the braid base hurts before the crochet hair is added, it is too tight. Fix it before continuing.
Step 4: Open the Crochet Needle
Take the crochet needle and open the latch. Slide the needle under the cornrow where you want to place the first piece of hair.
Beginners should start at the back of the head. This gives you room to learn the motion before working near the front hairline.
The basic motion is:
- Slide the open needle under the braid.
- Hook the crochet hair onto the needle.
- Close the latch.
- Pull the hair through the braid.
- Open the loop.
- Pull the ends through the loop.
- Tighten gently.
The knot should feel secure, but it should not pull on the braid.
Step 5: Install From Back to Front
Install the crochet hair in rows, starting from the back and moving upward. This helps you control fullness and spacing.
Spacing matters:
- Use wider spacing in the back if the hair is very full.
- Use closer spacing near the crown if you need more coverage.
- Use smaller pieces near the hairline for a natural finish.
- Step back often and check the shape.
Do not place pieces too close together at the beginning. You can always add more hair later, but removing excess hair takes more time.
Step 6: Control the Hairline
The hairline can make or break a crochet install. Too much hair at the front can look bulky. Too little hair can show the braid base.
For a natural front:
- Use smaller crochet pieces near the edges.
- Avoid tight knots at the hairline.
- Leave a little space so the front can move naturally.
- Blend baby hairs only if you like that look.
- Do not overload the temples.
If you want the front to look softer, place hair slightly behind the edge instead of directly on the most fragile hairline area.
Step 7: Shape the Style
Once the hair is installed, shape it gently. Do not cut too much at once. Curly and wavy crochet hair can shrink or expand after styling.
Shaping tips:
- Finger-comb curly textures before using tools.
- Trim long uneven pieces slowly.
- Shape around the face in small sections.
- Lift the crown for volume if needed.
- Separate curls only enough to create fullness.
If you are using human hair crochet, you may have more flexibility to refresh, define or style the hair after installation.
How Many Packs Do You Need?
Most crochet installs need 5 to 7 packs. Short styles may need 4 to 5 packs, medium styles usually need 5 to 6 packs, and long or extra-full styles may need 7 to 8 packs.
| Style | Suggested packs |
|---|---|
| Short crochet style | 4-5 |
| Medium crochet style | 5-6 |
| Long crochet style | 6-7 |
| Extra-full style | 7-8 |
If you are unsure, buy one extra pack as backup. For a deeper guide, see AliGrace How Many Packs of Crochet Hair Do You Need?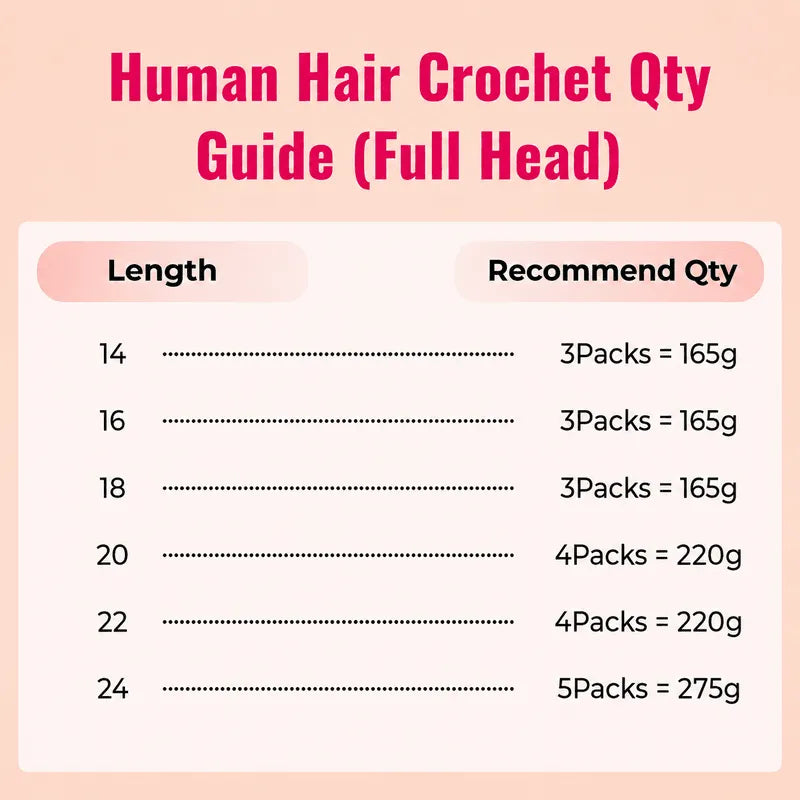
Best Crochet Textures for Beginners
Beginners should choose textures that are forgiving and easy to shape.
| Texture | Why it works |
|---|---|
| Burmese curly | Soft, full and natural-looking |
| Kinky curly | Blends well with natural textures |
| Deep wave | Defined and polished |
| Water wave | Soft and flexible |
| Body wave | Looser, everyday movement |
Curly and textured crochet hair can hide small spacing mistakes better than straight crochet hair. That makes them easier for many first-time installers.
How to Sleep With Crochet Hair
Night care helps prevent tangling and frizz.
Before bed:
- Separate the hair gently with your fingers.
- Put the hair into loose sections if it is long.
- Cover with a satin bonnet or scarf.
- Sleep on a satin pillowcase if possible.
- Refresh in the morning with light mist or mousse.
Do not sleep with the hair loose and unprotected every night. Friction can make the style frizzy faster.
How to Refresh Crochet Hair
Refreshing depends on the texture. Curly and wavy textures usually need moisture and light definition.
Use a simple refresh routine:
- Mist lightly with water.
- Add a small amount of leave-in spray or mousse.
- Separate curls with fingers.
- Trim frizzy ends only when needed.
- Avoid heavy oil near the roots.
Human hair crochet can usually handle more styling flexibility than synthetic crochet, but gentle care still matters.
Common Beginner Mistakes
Installing Too Much Hair
Too much hair can make the style heavy and bulky. Start with moderate spacing, then add more only where needed.
Braiding Too Tightly
Tight cornrows can cause scalp discomfort and edge tension. A protective style should feel secure, not painful.
Using Large Pieces at the Hairline
Large pieces near the front can look unnatural. Use smaller sections around the hairline.
Ignoring Pack Count
Running out of hair mid-install can leave the style unfinished. Plan your pack count before you begin.
Skipping Night Protection
Crochet hair can tangle faster without a bonnet or scarf. Protect the style every night.
Recommended AliGrace Options
For a beginner-friendly crochet install, start with AliGrace Crochet Hair. Choose a texture based on the final look you want:
- Burmese curly for soft volume and natural fullness.
- Kinky curly for textured blending.
- Deep wave for defined curls.
- Water wave for a softer wave pattern.
- Body wave for looser movement.
- Straight for a sleek crochet look.
If you are comparing protective styles before installing, read AliGrace Crochet Hair vs Half Wig. If you decide you want a removable style instead, AliGrace Half Wigs may be easier for daily wear.
Final Recommendation
For beginners, the easiest crochet install starts with clean stretched hair, gentle straight-back cornrows, medium spacing and a textured crochet style that hides small mistakes. Work from the back to the front, use smaller pieces near the hairline and stop adding hair once the style looks full.
Choose AliGrace crochet hair if you want a protective style with natural movement, flexible texture options and less daily styling once the install is finished.
FAQ
Is crochet hair easy to install for beginners?
Yes, crochet hair can be beginner-friendly if you use a simple braid pattern and work slowly. Straight-back cornrows are usually easiest for a first install.
How long does it take to install crochet hair?
A beginner crochet install may take a few hours, depending on braid pattern, pack count and texture. With practice, the process becomes faster.
Do I need cornrows for crochet hair?
Most crochet installs use cornrows as the base. The cornrows give the crochet needle a secure place to attach the hair.
How many packs of crochet hair do beginners need?
Most beginners need 5 to 7 packs for a full crochet style. Short styles may need less, while long or extra-full styles may need more.
Can crochet hair damage edges?
Crochet hair should not damage edges if the braids are gentle and the hair is not too heavy. Avoid tight cornrows and heavy placement near the hairline.
Can I wash crochet hair after installing it?
Yes, but wash gently. Focus on the scalp, avoid rough rubbing and let the hair dry fully to reduce tangling and buildup.


